Garuda Linux is fairly new to the Linux world and is surely a promising Linux distro. It provides great features combined with nice performance to impress us at first glance. Garuda Linux’s dragonised version is aesthetically splendid. If you are looking for a new great-looking Arch-based Linux distro then you can try using Garuda. You can also take a look at these awesome lightweight Linux distros for older computers and laptops.
To install it you don’t need a new separate PC, you can install Gaurda alongside Windows on your PC in dual boot. This makes trying and using it easy and once you like it you can always make Gaurda your main operating system.
So without further ado let’s see how to install Garuda alongside Windows in dual boot.
Step 1: Download Gaurda Linux ISO
You can download Garuda Linux ISO by clicking on this link. For this tutorial, I am downloading KDE dragonised variant. This has modified KDE with a neon look and nice aesthetics providing your PC futuristic look.
On the above link scroll down and click on Download KDE Dragonised Edition or any other variant which you want. Then click on the site from which you want to download, I clicked on From Sourceforge. Then just wait for a few seconds and the download will begin. Now till download completes let’s setup the other required things.
Step 2: Download Rufus
Rufus is the free and open-source software that you will need to create a bootable USB drive. Click on this link and you will be navigated to Rufus’s website. Scroll down and below Download click on the latest version of Rufus to begin downloading.
Step 3: Creating Free Space for Installation of Gaurda
To Install Garuda 40 GB of disk space is recommended. So you need to create that disk space from one of your Windows partition if you don’t already have free disk space on your disk. To create free space just follow the below instructions.

- Search for Disk Management or Create and format hard disk partition.
- Then click on the first option Create and format hard disk partition.
- In the Disk Management tool, you should see the disk drives on your PC. Locate the drive with the required free disk space. Then right-click on the drive and select Shrink Volume.
- In the space Enter the amount of space to shrink, enter the amount of memory(in MB) you would like to allocate to the Garuda Linux. I am going to allocate 100 GB that’s why entering 102400 MB.
- Then click on Shrink and wait for it to complete.
- Once done close the Disk Management.

Step 4: Creating Bootable USB for dual booting Garuda
Now when the download of Garuda ISO and Rufus is completed, proceed with this step. Plug a USB flash drive of a minimum of 4GB in your PC and then open Rufus. In the Device section just check if the right USB drive is selected (if you have multiple USB flash drives plugged in).

Then click on Select to Browse for the downloaded Guarda Linus ISO file. Browse to the location of the downloaded Garuda ISO file and select the file. Do note your USB drive will get formatted, backup the data if you have it on your USB drive. Now when you are sure just click on Start, it will tell you the USB drive will get formatted click on OK. Now, wait for it to complete, and once done you can follow the next step.
Step 5: Booting from Gaurda USB drive
When the above creating of the bootable USB drive is complete Restart your PC. When the PC restarts press the BIOS menu key just at the system startup (when the manufacturer’s logo appears). For most of the systems, F2 is the BIOS menu key if you don’t know you can look for it online with your motherboard or system manufacturer’s name.
When you press the BIOS menu key you should get into BIOS menu. When inside BIOS menu navigate to Boot tab, and in the boot tab you should see the bootable devices. This list has order of priority to boot from when your PC boots. In that bring the USB drive at top using the mentioned keys.
Once its done press F10 to save changes and exit.
Step 6: Running Garuda for the first time
After the above system should boot from Garuda bootable USB drive. In this, you get various options just select the Boot Garuda and press enter. Wait and the system will boot into live Gaura mode, you can try using Garuda here. When you are sure to Install, click on Install Garuda Linux. And if possible connect your PC to the Internet.
Step 7: Installing Garuda Linux
Once you click on the desktop icon to Install Garuda Linux, Installer will open. Then follow the instructions below to complete the Installation progress.
- On the first page select your preferred language and then click on Next.
- Then select your time zone and click on Next.
- Select your keyboard layout and then click on Next.
- On the next screen, click on the select storage device and select the hard drive on which you wish to install the Garuda Linux. (If you have multiple hard disks.)
- Now click on Manual Partitioning, and click on Next.
- Now click on the Free Space and click on Create.
- Create the following partitions, I am creating partitions with 100 GB you can change the size of the individual disk according to available disk space and your requirement. Or you can just keep a similar ratio and create partitions according to your available space.
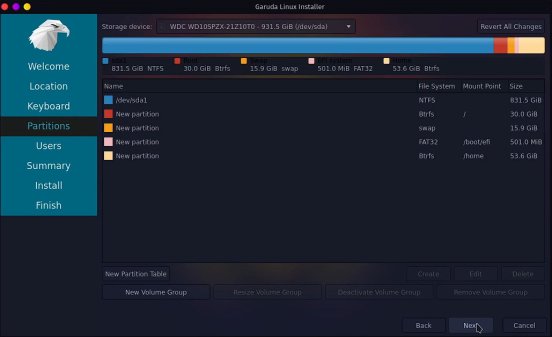
- Size: 30720 MB, File System: btrfs, Mount Point: /, Flags: root
- Size: 16300 MB, File System: linuxswap, Flags: swap
- Size: 501 MB, File System: fat32, Mount Point: /boot/efi, Flags: boot
- Size: 54880 MB, File System: btrfs, Mount Point: /home,
Now click on Next, Fill the form with details and click on Next. Check the changes and when you are sure click on Install. Wait for the installation to complete once done remove the USB drive. This is how to install Garuda Linux, now just restart the system.
Step 8: Completion of Installation and first boot

Once you restart you should see Garuda boot loader after your system restarts. (If this doesn’t happen you change the boot order as we did in Step 5 to bring Garuda at the top.) Now when your Guarda Linux boots you will be at the lock screen enter the password and you are done. You have booted into the Garuda Linux.
One additional tip: Once you are done with everything do remember to bring USB at lower boot priority in the bios menu.
Conclusion:
So in this article we saw how to install the latest Gaurda Linux KDE dragonised alongside Windows in dual boot. I hope this article helps you. If you like this article do share this article with your friends(sharing is caring) so that they also can use this beautiful Linux distro.
thanks alot of information